MaxPhisher is an open-source multi-phishing tool available on GitHub. It has grown more and more popular to use it in phishing attacks against Target. MaxPhisher is user-friendly and very simpler to use as compared to Social Engineering Toolkit. For 75 well-known websites including Tiktok, Twitch, Pinterest, Snapchat, GitHub, Proton mail, Spotify, Netflix, LinkedIn, WordPress, Origin, Adobe, Jio, Zomato, etc, it has provided phishing webpages templates. Additionally, it offers the user the option to select a special template if they desire. With the use of this tool, phishing assaults can easily gain credentials such as an ID Password or OTP. Most importantly this tool has extra features such as Location tracer, ClipBoard phishing, Webcam phishing, etc.

Features:
- Multi-platform (Supports most Linux)
- 100+ templates
- Concurrent 4 tunneling (Ngrok, Cloud-flared and LocalXpose, LocalHostRun)
- OTP Support
- Credentials mailing
- Easy to use
- Possible error diagnoses
- Built-in masking of URL
- Custom masking of URL
- URL Shadowing
- Portable file (Can be run from any directory)
- Get IP Address and many other details along with login credentials.
Requirements:
- Python3
- bs4
- PHP
- SSH
If the above requirement is not found, PHP, ssh, and Python modules will be installed on the first run.
Installation:
Step 1: To proceed with the installation, Go first to the Desktop directory then use the following command to clone the GitHub repository.
cd Desktop
git clone git://github.com/KasRoudra/MaxPhisher

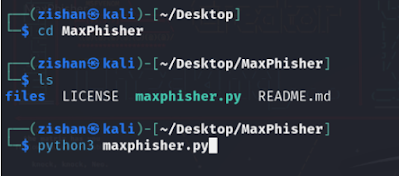
Step 2: Now the tool is cloned to the Desktop Directory. So now we have to move to the tool Directory ie. MaxPhisher.
cd MaxPhisher
Step 3: After moving to the Tool Directory, list the files inside it by typing the following command.
ls
Step 4: You can see the Python file. It's the main file to run the tool. So, Now type the following command to run the tool.
python3 maxphisher.py

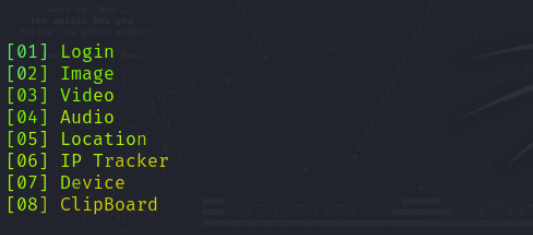
Step 5: After execution of the tool, The main menu will appear. It will show 8 different options to create a phishing page. Not only the login pages but also different types of phishing.
Step 6: As Many people know about login phishing, So we will be opting for option 5 ie. Location Tracing. It will trace the location of the victim and return you the longitude and latitude value.

Step 7: After entering into the location
menu, it will show you 4 different templates to choose from so the
phishing page will look legitimate. Let’s select option 1(The most
suitable option).

Step 8: After a few seconds, it will show you different URLs and Masked URLs also or you can opt for a custom URL too. These URLs are phishing link that hosts your phishing page.
Now just copy any URL which you like is most suitable, we prefer to choose the Cloudflare masked URL as it looks most legitimate among others. After copying send it to the victim.
Now, how the page will look from the victim’s side after the victim opens the link.

As you can see the webpage shows the weather of some location. The victim will now change the location to fetch his/her location weather and then the browser will ask for location permission.

A pop-up will appear asking the user for location permission. When the victim will allow to access his/her location, the page will record the location of the victim and send it to the attacker, the tool will now show the attacker victim’s accurate location. It will be reflected on the terminal itself.

The above image shows the location detail of the victim with more details of the victim. you can now search for the exact location by using Latitude and Longitude values on any website which gives the location on the map by longitude and latitude value. You can find the website by searching on Google.
Comments
Post a Comment